How to Make a Granny Square Blanket from Leftover Scrap Yarn

Everybody that knows me, knows that recycling and upcycling are important things in my life. I never throw away anything that can be modified and repurposed into something useful and beautiful.
If you follow my Instagram Feed you know I was left with lots of doll clothes after making a bunch of clowns (literally) out of the dolls for last year’s Halloween Carnevil Party.


It not only recycles any knits and yarn you might have laying around saving it from the landfill, but it also preserves your memories you have attached to the item.
My blanket is made of a pair of woolly socks Mr.B bought me while on holiday a couple of years back, parts of a sweater I used to wear back in university many years ago and the doll clothes.
Each granny square has a story and puts a smile on my face every time I look at it.
THIS YEAR I HAVE DECIDED TO GIVE ALL OF YOU THE CHANCE TO GET A FREE VERSION OF MY PREMIUM PATTERNS AND MAKE SOMETHING BEAUTIFUL FOR YOUR LOVED ONES.
EVERY TIME I RELEASE A PREMIUM PATTERN, A PROMO VERSION WILL BE AVAILABLE TO DOWNLOAD FROM MY BLOG FOR 3 DAYS ONLY.
DON’T MISS OUT! SIGN UP TO MY NEWSLETTER AND FOLLOW CRAFTING HAPPINESS FACEBOOK PAGE TO BE NOTIFIED WHEN THE NEXT PATTERN OR TUTORIAL IS BEING POSTED.
YOU CAN FIND ALL MY PREMIUM PATTERNS IN MY ETSY STORE AND RAVELRY STORE

Each year I keep adding to it, one granny square at a time, one good memory at a time.
Please note that this post contains affiliate links, I will earn a small percentage should you choose to purchase something, but it will be at no cost to you. You can see my full disclosure policy here. Thank you for supporting my work and this blog.
Things I used:

- seam ripper to take apart the clothes
- crochet hook, I usually use a hook size UK10-US4 for most of my projects unless I work with really thin or really thick yarn
- large eye blunt sewing needle to fit the yarn you are using, you will be needing it to join the granny squares together.
- leftover scrap yarn or knits you are not wearing or using anymore
- the classic granny square pattern (If you are not familiar with the pattern, I made a really useful tutorial on Crochet Classic Granny Square Pattern here.)

I chose to make larger than usual granny squares because it is so much easier and faster to join them together.
The pattern I used is the classic granny square pattern to which I added a few more rounds, 8 in total to be more exact (the regular pattern has usually 5).
It is a really easy pattern, but if you are new to crocheting, you can learn how to make Crochet Classic Granny Square Pattern here.

Make as many granny squares as you want or have yarn for, you can choose to make them in one color or use 2 or more colors in a square, your choice, there is no wrong way of doing it.
I chose to use 2 colors per square.

As you can see in the picture below, when I started making granny squares from the dolls’ clothes, my blanket was already started and at this point, I was just adding squares around it (hence the different colors in the rounds).


Once your granny squares are made up, get your matching yarn and a blunt large needle and start joining them together.
There are different techniques used to join them, but in my opinion, the one I use is the best because it seamlessly joins the squares and you can tell the difference on both sides of the blanket.

I made a separate tutorial on how to join two granny squares, you can find Crochet Classic Granny Square Pattern here.
Below you can see the technique I use to join the squares.

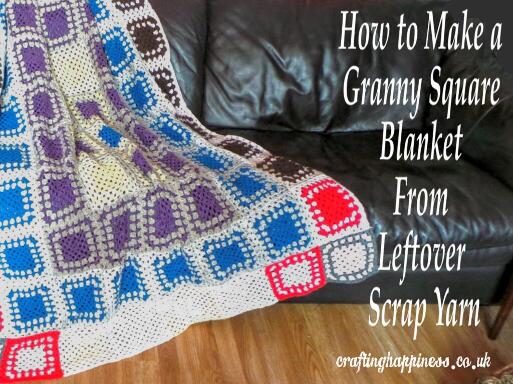
And this is my blanket which is still not finished, I want it a bit bigger, but I ran out of yarn for now.
The moment anything knitted in our home becomes useless or damaged, it will surely make it into my blanket, I am planning to have one or maybe two more rounds added to it.


You can choose to make the blanket as big or small as you like, the beauty of this concept is that you can customize it to your needs, make a baby blanket out of your yarn leftovers or turn it into a bedspread, as I said, there is no wrong option.
Once finished, you can choose to add a border to your blanket (or not!). I will probably do it because it will make the blanket look complete and nicer looking.
Looking for other crochet baby blankets?
Browse the entire library HERE.
If you found this tutorial helpful, please share and Pin it! Follow me on Pinterest here.
Tag me @craftinghappinesscrochet with your creations.
COPYRIGHT:
The pattern and photographs on this listing are the property of Crafting Happiness, don’t use them to advertise your own creations.
This pattern and design are subject to copyright and are for personal, non-commercial use only.
You can sell the items made with this pattern on a small scale if you made them yourself (e.g. handmade to order or sold at fairs etc).
Mass production of items using my patterns is not allowed without my written approval.
You may not distribute or sell this pattern under any circumstances.
Happy crocheting!

❤ this!! Im a very crafty person myself so im gonna have to try this!!
Thank you :). It's very easy and fun to make.