Easy Free Crochet Rose Bag Charm Pattern


Crochet Rose Bag Charm – Pattern Description
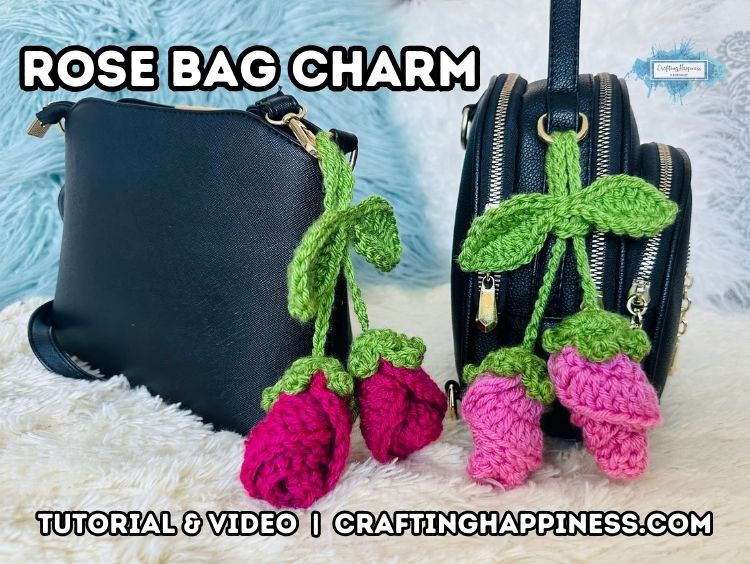
I am delighted to present this lovely Rose Bag Charm pattern to you!
I made this super easy mini rose charm for beginners. It’s a quick project that’s perfect for using up your scrap yarn and works up really fast.
I used Aran yarn with a 4.5mm hook, and the finished charm is about 20cm tall, with the flowers being 7cm tall.
This is such a quick and easy pattern that’s perfect for adding a little handmade touch to your bag.
As you can see, it looks lovely in this color and I really believe it would look just as beautiful in other colors!

The leaves and stem are crocheted in green, while the flowers can be pink, red, or purple.
You can use this versatile charm to decorate your bags, backpacks, your room, or even hang it on furniture knobs.
This little charm is great for anyone who wants to make a quick and simple project.
It’s also a great idea if you’re looking for things to sell at craft fairs.

Please note that this post contains affiliate links. I will earn a small percentage should you choose to purchase something, but it will be at no cost to you. Please read the disclosure policy.
Rose Flower Bag Charm Free Crochet Video Tutorial
I’ve put together a full video tutorial to walk you through every step of this rose flower bag charm pattern. Sometimes seeing it done makes all the difference!
Subscribe to Crafting Happiness YouTube Channel to save this video for later.
How to Crochet the Rose Flower Bag Charm
Save this tutorial to your Pinterest crochet board here. Don’t forget to tag me @CraftingHappinessCrochet with your creations, I would love to see them and share them with my fellow crocheters.

How To Get The Ad-Free PDF For The Crochet Rose Flower Bag Charm
This pattern is bundled with 4 other flower bag charms: Calla Lily, Lavender, Bell Flower, and Lily of the Valley.
You can buy all 5 patterns for a reduced price from my shop.

PATREON
- Crochet Pro and Pattern Lover members have access to exclusive videos of this design.
* TAX is added to the price based on your country of residence.
How To Crochet The Rose Flower Bag Charm
Rose Flower Bag Charm – Pattern Notes
Level
- Beginner
Type
- Bag charm
- Hanging decor
Size
- Project – 20cm tall
- Flowers – 7cm tall
Yarn Used
- Aran yarn in green for the leaves and stem; purple, pink, or red for the flowers
Supplies
- 4.5mm crochet hook,
- darning needle,
- stitch marker (optional)
Rose Flower Bag Charm – Crochet Abbreviations
This free flower bag charm pattern is written in US terms using Craft Yarn Council abbreviations.
- mr – magic ring
- sl st – slip stitch
- sc – single crochet
- yo – yarn over
- st(s) – stitch(es)
- ch(s) – chain(s)
- hdc – half double crochet
- dc – double crochet
- sk – skip
Rose Flower Bag Charm – Written Pattern
A few things to keep in mind before you start:
- The stitches between ( ) are to be made into the same stitch or chain space (as instructed).
- The stitches between * * are to be repeated as many times as instructed.
- If the pattern contains stitches between ** **, they are to be repeated as many times as instructed, including the * * repeats within.
- The number at the end of a row or round is the number of stitches unless otherwise stated.
The Flower Pattern

With red and a 4.5mm hook, make a magic ring.
Round 1: Make 12 dc in the magic ring, then sl st to close the round. (12 sts) = 12
Round 2: ch 3 (counts as 1 dc), dc in the same st, (2 dc) x 11, sl st = 24
Round 3: ch 3 (counts as 1 dc), dc in the same stitch (2 dc) x 23, sl st = 48
Fasten off, leave a long tail, but leave both ends un-weaved—the long tail and the magic ring tail.
To create the rose, roll the circle tightly and then wrap the long tail around it, above the magic ring to keep it secure.
Use the 2 tails to make a double knot and then flip the bottom part of the rolled circle over the top part to create the rosebud.
The Leaves Pattern

With green, ch 17.
Row 1: sc in 2nd ch from hook, hdc, dc, (2 dc), dc, hdc, sc, sl st in next 2 chs, sc, hdc, dc, (2 dc), dc, hdc, (3 sc) in last ch, turn your work around with the bottom up so you can work on the other side of the chain, and continue from there, hdc, dc, (2 dc), dc, hdc, sc, sl st in next 2 chs, sc, hdc, dc, (2 dc), dc, hdc, (2 sc) in the last chain, sl st into the first sc you made in the row to close it = 38
Fasten off and weave in all ends.
The Stem

With green and a 4.5mm hook, make a slip knot.
Row 1: ch 45, fasten off, leave both yarn ends.
The Sepal Pattern

With green and a 4.5mm hook, make a magic ring.
Round 1:10 sc into magic ring = 10
Round 3: * ch 4, sc in 2nd ch from hook, hdc, dc, sk 2, sl st in next * x 5, fasten off, leave a long tail, we will use it to sew the sepals to the rose = 5 sepals.
Round 2: (inc, sc) x 5, sl st = 15
Make sure not to weave in the magic ring tail, we will need it.
How to Assemble

Pull the stem ends through the slip stitches of the leaf, one end through one slip stitch. If you thread both ends through just one slip stitch, the leaf will slide off the stem.
Once done, use a needle to pull the yarn end from the stem through the magic ring of one sepal.
Once through, knot it together with the magic ring’s tail, to make a double knot and secure the sepals to the stem.
Cut the ends shorter or weave them in.
Do the same on the other sepal.
Now use the long yarn tail from the sepals to sew them to the rosebud.
Use pins to secure it to the flower and use back & forth simple stitches.
Leave the tips of the sepals detached so they can curl up.
Save this tutorial to your Pinterest crochet board here. Don’t forget to tag me @CraftingHappinessCrochet with your creations, I would love to see them and share them with my fellow crocheters.

Looking For Similar Crochet Patterns To The Rose Flower Bag Charm?
- Easy Free Crochet Rose Bag Charm Pattern

- Free Crochet Bell Flower Bag Charm Pattern

- No Sew Crochet Cats & Dogs Free Pattern

- Daisy Granny Square

Copyright
The photographs in this tutorial are subject to copyright. They are the property of Crafting Happiness. Don’t use them to advertise your own creations. You may use photos from this post only if you directly link back to this tutorial.
Happy Crocheting!


