White Poinsettia Blanket Free Crochet Pattern


White Poinsettia Blanket – Free Crochet Pattern
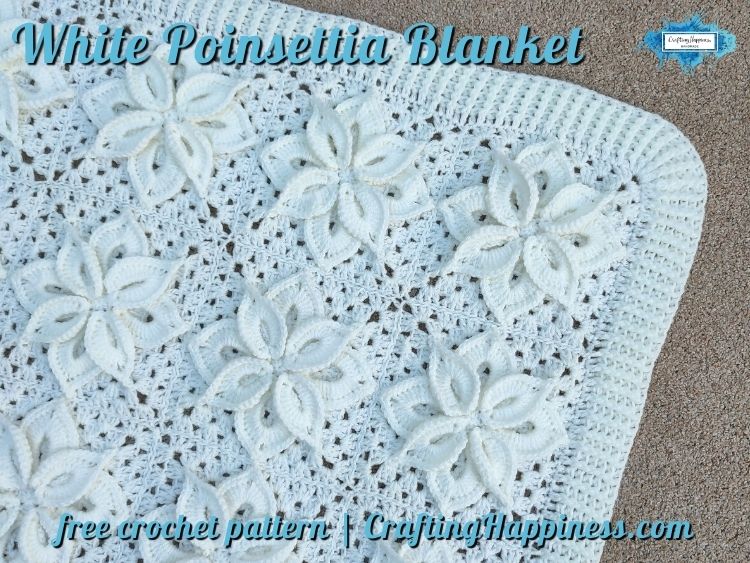
The White Poinsettia Blanket is one of those beautiful and timeless blankets you can easily make and keep as a family heirloom or a versatile home decor piece.
This blanket is made of delicate crochet poinsettia squares sewn together using the invisible seam technique. Then I crocheted around the blanket with the rib border.
If you want to create a bigger blanket, you can do so by simply adding more poinsettia squares. Also, you can make the squares larger if you like the poinsettias to be further apart from one another.
Its all-white color makes it a perfect gift to anyone who has a minimalist home and wants a clean, elegant aesthetic. But as always, feel free to switch the white to a different color you desire.
I designed the blanket using double knit (light worsted #3) yarn. You can use other yarn weights to match your needs and preference.
Scroll down for the step-by-step pattern.
Please note that this post contains affiliate links, I will earn a small percentage should you choose to purchase something, but it will be at no cost to you. You can read the disclosure policy here.

Video Tutorials
Subscribe to Crafting Happiness YouTube Channel to save this video for later.
White Poinsettia Blanket Playlist
CROCHET POINSETTIA SQUARE – Crochet With Me For An Hour And Make This Beautiful Blanket Square
Crochet Poinsettia Square – a STEP-BY-STEP pattern for your leftover Christmas yarn!
How To Do The Invisible Seamless Join Technique
Pattern Notes
Level
- intermediate
Project Size/ Gauge
- 75cm by 95cm
- each square is 16cm by 16cm
Pattern Characteristics
- baby blanket
- textured
Yarn Used
- Acrylic DK Yarn in Cream
Supplies
- 6 x 100g Acrylic DK Yarn (300m per ball)
- 4.5mm crochet hook
- tapestry needle
- scissors
Format & Terms
- Pattern written in US terms using Craft Yarn Council abbreviations.
- Written in English only
Abbreviations
Pattern written in US terms using Craft Yarn Council abbreviations.
- magic ring
- ch – chain
- yo – yarn over
- sl st – slip stitch
- sk – skip
- sc – single crochet
- hdc – half double crochet
- dc – double crochet
- pst – picot stitch
- fpdc – front post double crochet
- bpdc – back post double crochet

Special Stitches
Picot Stitch (pst) – ch3, sl st in the base stitch (NOT the base chain) by inserting the hook through the middle of the stitch and behind the loops.
Front Post Double Crochet (fpdc) – The front post double crochet is constructed just like the regular double crochet stitch, except it is made around the stitch post below rather than in the stitch below.
Step 1: Yo, insert the hook, from the front side of your work to the back and around the stitch post below, yo and pull up a long loop (3 loops on hook).
Step 2: Yo and pull through 2 loops on hook (2 loops on hook), yo and pull through the 2 remaining loops on hook.
Back Post-Double Crochet (bpdc) – The back post double crochet is constructed just like the regular double crochet stitch, except it is made around the stitch post below rather than in the stitch below.
Step 1: Yo, insert the hook, from the back of your work back to the front and around the stitch post below, yo and pull up a long loop.
Step 2: Yo and pull through 2 loops on hook (2 loops on hook), yo and pull through the 2 remaining loops on hook.
White Poinsettia Blanket – Written Pattern
- ch3 at the beginning of the round counts as a dc stitch
- ch2 at the beginning of the border rounds do not count as a stitch, they are for height only
- the section between * * is the section that needs to be repeated
- the section between ( ) is crocheted in the same stitch or chain space
The Poinsettia Squares

The White Poinsettia Blanket is made with 20 Poinsettia Squares.
With Cream yarn and a 4.5 mm hook, create a magic ring.
Round 1: working in the magic ring, 8hdc, sl st, pull the tail of the magic ring to close it shut = 8
Small Petal
Round 2: ch11, sl st in 10th ch from hook, sl st inside the newly formed loop, (ch2, 2hdc, 8dc, ch3, 8dc, 2hdc, ch2, sl st) inside the loop
Round 3: (3sc) around the ch2, sc in next 10 stitches, (sc, hdc, Pst, sc) in the ch3 space, sc in next 10 stitches, (3sc) around the ch2, sl st in the first sc made in the loop, sl st in the same stitch from there you chained 11, ch2, sk1, sl st in next.
Repeat Rounds 2 and 3, 3 more times, sl st in the ch2 space made on Round 3.
Large Petal
Round 4: ch14, sl st in 13th chain from the hook, sl st inside the newly formed loop, (ch2, 3hdc, 10dc, ch3, 10dc, 3hdc, ch2, sl st) all in the new loop
Round 5: (3sc) around the ch2 space, sc in next 13 stitches, (sc, hdc, Pst, sc) in the ch3, sc in next 13 stitches, (3 sc) around the ch2 space, sl st in the first sc made at the beginning, sl st in the same stitch from where you ch14, ch2, sl st in next ch2 space made on Round 3
Repeat Rounds 4 and 5, 3 more times, sl st in the next ch2 space made on Round 5.
The Granny Square
Round 6: (ch3, 2dc, ch3, 3dc) in the same ch2 space, *(3dc, ch3, 3dc) in next ch2 space* x 3, sl st at the top of ch3 made at the beginning.
From this point, all stitches are made in the spaces between the clusters of (3dc) and in the ch3 spaces of the corners
Round 7: (ch3, 2dc) in the space, *(3dc, ch3, 3dc) in the ch3 space, (3dc) in next space* x 3, (3dc, ch3, 3dc) in the ch3 space, sl st at the top of ch3
Round 8: (ch3, 2dc) in the space, (3dc) in next space, *(3dc, ch3, 3dc) in next ch3 space, (3dc) in next 2 spaces* x 3, (3dc, ch3, 3dc) in next ch3 space, sl st at the top of ch3
Round 9: In this round, we will attach the small petals to the square.
(Ch3, 2dc) in the space, (3dc) in next 2 spaces, *(3dc, ch1, keep the loop on the hook and then insert the hook through the top of the small leaf, yo and pull through all the loops on the hook, ch1, 3dc) in ch3 space, (3dc) in next 3 spaces* x 3, (3dc, ch1, insert hook through the top of the leaf, yo, pull through all loops, ch1, 3dc) in ch3 space, sl st at the top of the ch3
Round 10: (ch3, 2dc) in the space, (3dc) in next 3 spaces, *(3dc, ch3, 3dc) in ch3 space, (3dc) in next 4 spaces* x 3, (3dc, ch3, 3dc) in ch3 space, sl st at the top of ch3
Round 11: In this round, we will attach the large petals to the square.
(ch3, 2dc) in the space, (3dc) in next space, (2dc, keep the loop on the hook and insert the hook at the top of the large leaf, yo and pull through the loops on the hook, 1dc) in next space, (3dc) in next 2 spaces, *(3dc, ch3, 3dc) in the ch3 space, (3dc) in next 2 spaces, (2dc, insert hook at the top of the large leaf, yo and pull through the loops on the hook, dc) in next space, (3dc) in next 2 spaces* x 3, (3dc, ch3, 3dc) in the ch3 space, sl st at the top of ch3, fasten off, weave in all ends.
Joining The Poinsettia Squares Into A Blanket


Place all the squares on a flat surface such as the floor or a table.
Use Cream color yarn and the seamless join technique to sew the squares in long strips (5 strips of 4 squares).
Then sew the strips to each other.
The Border

Round 1: Start in the corner ch3 space, join the yarn and ch2 (does not count as a stitch), *9dc in the ch3 space, dc in each stitch across the edge until you reach the next corner ch3 space* x 4, sl st in the first dc you have made at the beginning of the round.
Round 2: ch2 (does not count as a stitch), *fpdc in the dc post below, bpdc in the following dc post below*, repeat from * until you reach the end of the round, sl st into the first fpdc you made in the round.
Rounds 3 – 6: ch2 (does not count as a stitch), *fpdc around the fpdc post below, bpdc around the bpdc post below*, repeat from * until you reach the end of the round, sl st in the fpdc that you made at the beginning of the round.
Fasten off and weave in all the ends.
Enjoy your newly-made White Poinsettia Blanket. If you found this tutorial helpful, please share and Pin! Follow me on Pinterest here.
Don’t forget to tag me @craftinghappinesscrochet with your creations, I would love to see them and share them with my fellow crocheters.
Buy This Pattern
Get the detailed pattern with step-by-step photos and tutorials in PDF format from the links below.

CRAFTING HAPPINESS PATREON
If you’d like the ad-free, printable PDF pattern for this design, consider joining my Patreon**.
Based on the tier you choose, you will also receive:
- Monthly coupon for 50% or 100% off a premium pattern from my shop.
- All the tutorials and other free patterns from the blog in PDF format.
- Ad-free exclusive videos
- help and support if you are stuck
JOIN PATREON***
* TAX is added to the price based on your country of residence.
** The premium pattern is available inside the Crochet Club for an entire month advertised above after which it gets removed and replaced with the next premium pattern.
*** This is a monthly subscription for our Facebook Fan Crochet Membership where you get access to our private crochet group from where you can access all the files & videos, and you can interact with other like-minded people.

Looking For Other Baby Blanket Patterns?
- Crochet Rose Bouquet Blanket Free Pattern

- Crochet Sunflower Bouquet Blanket – Free Crochet Pattern

- Strawberry Ripples Baby Blanket Free Pattern

- White Poinsettia Blanket Free Crochet Pattern

- Winter Snowflake Afghan Free Crochet Pattern

- White Waterlily Baby Blanket Free Pattern

- Crochet Trellis Flowers Baby Blanket

- Christmas Snowflakes Afghan Free Crochet Pattern

COPYRIGHT:
The photographs on this tutorial are subject to copyright and are the property of Crafting Happiness, don’t use them to advertise your own creations. You may use photos from this post only if you directly link back to this tutorial.
Happy Crocheting!


This is a beautiful blanket. It looks especially lovely all in white and I would imagine it would be passed down as an heirloom. Thank you so much for sharing the pattern with us.
Thank you 💞