Free Amigurumi Cat Bee (Cee) Low Sew Pattern


Amigurumi Cat Bee (Cee) Pattern Description
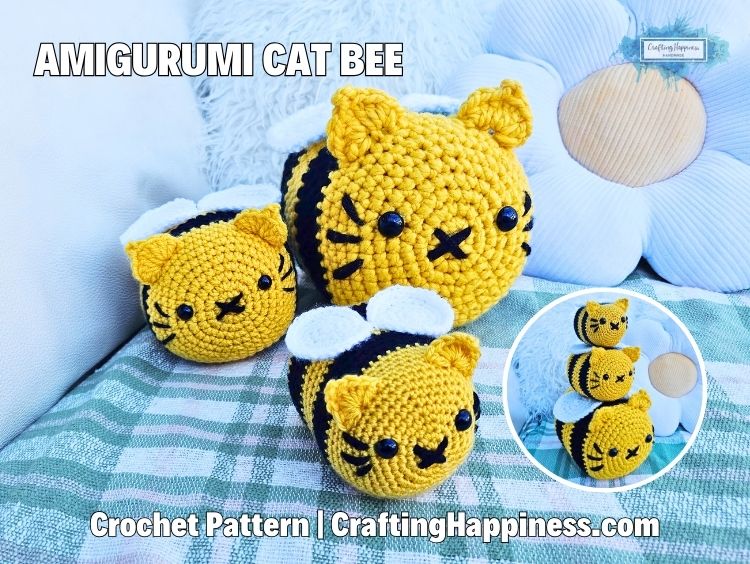
The amigurumi cat bee is an easy and fun low-sew crochet that brings together the cuteness of a cat and a bee.
This pattern is simple enough for beginners but detailed enough to keep even experienced crocheters interested.
You’ll love how quick it works up and how little sewing it requires.
The amigurumi cat bee can be made in three sizes based on the yarn you are going to use.
These are great for gifts, décor, or even a soft toy.

This crochet is perfect for anyone who enjoys kawaii décor, kids who want a new toy, and for those who need a project for using up yarn scraps.
It’s also excellent for beginners learning to crochet and for selling at markets or online because it works up so quickly.
The amigurumi cat bee has only a 2 parts: body and wings, so there’s no need to worry about lots of complicated shaping.
This pattern uses the exact same body shape as the famous TikTok bee, but I’ve added unique cat face and ears!

If you’re new to amigurumi, this is a good pattern to start with.
The stitches are simple, and the rounds are easy to count.
You’ll practice basic stitches like single crochet, increases, and decreases while making something super cute at the same time.
You can use acrylic DK yarn or any yarn you already have at home.
Play around with colors, make your cat bee in yellow and black, or switch it up for fun pastel versions.
For sizing reference, using Aran yarn with a 5mm hook results in a medium-sized cat bee, approximately 12 cm in diameter and 16 cm long, using 12mm eyes.

If you use Super Bulky yarn with an 8mm hook, you’ll get a large size, about 20 cm in diameter and 25 cm long, also using 12mm eyes.

The pattern also includes instructions for placing the eyes, shaping the ears, and adding the wings neatly.
When I created this cute cat bee which I’m calling a “cee”, the goal was to take that loved, quick-to-make, round body shape and give it a fresh, new twist by combining it with another favorite animal: the cat.
I essentially reworked the original bee pattern to incorporate tiny cat ears directly into the head/body (making it one piece) and added a simple embroidered face and whiskers.
The key benefit of this new design is the low-sew construction, the head, body, and ears are all made in one piece, meaning you only need to attach the wings and embroider the face.
This crochet pattern is also incredibly versatile, giving you instructions to make Cee in three different sizes (small, medium, and large) simply by changing your yarn weight and hook size.

Please note that this post may contain affiliate links. I will earn a small percentage if you purchase any item through the links on this site, but it will be at no cost to you.You can see my full disclosure policy here. Thank you for supporting my work and this blog.
If you like this design, please Share and Pin! Follow me on Pinterest here.
Tag me @CraftingHappiness with your finished items, I would love to see how yours turns out.

Amigurumi Cat Bee (Cee) Video Tutorial
There’s also a full video tutorial that walks you through how to crochet the amigurumi cat bee step by step.
If you prefer learning visually, watching the video will make it easier to follow along with the rounds and see how to embroider the face.
Crochet Cat Bee Video Tutorial
Don’t forget to subscribe to the Crafting Happiness YouTube Channel so you can save the tutorial for later and be notified when new patterns are uploaded.
Ad-Free PDF Pattern For The Amigurumi Cat Bee (Cee)
If you want to support my work, you can get the ad-free printable PDF pattern for the amigurumi cat bee.
The PDF version includes step-by-step photos, detailed instructions, and easy-to-follow explanations. It’s perfect for your crochet pattern collection.
You can find it in my Etsy and Ravelry shops. Click below to grab your copy and start your next project.

* TAX is added to the price based on your country of residence.

How To Crochet The Amigurumi Cat Bee (Cee)
The amigurumi cat bee is made with simple stitches worked in the round. You’ll start from a magic ring to form the body, then continue increasing and switching colors for the stripes.
The wings are crocheted separately and sewn on at the end.
Crochet Cat Bee – Pattern Notes
Pattern Type:
- Amigurumi – Low Sew
Other Materials:
- Toy stuffing, safety doll eyes (10mm, 12mm, or 18mm), yarn needle
Size Of Hook Used:
- 3.5mm (small), 5mm (medium), 8mm (large)
Yarn Used
- Acrylic DK Yarn – Yellow, White, Black
Size
- Small (9cm),
- Medium (12cm),
- Large (20cm)
Cat Bee (Cee) Amigurumi Pattern – Crochet Abbreviations
This cat bee (Cee) amigurumi pattern is written in US terms using Craft Yarn Council abbreviations.
- sc – single crochet
- inc – increase (2sc in same stitch)
- dec – decrease (sc2tog)
- sl st – slip stitch
- yo – yarn over
- st(s) – stitch(es)
- sc blo – single crochet in back loop only
- sc flo – single crochet in front loop only
- pst – picot stitch
Written Pattern of Amigurumi Cat Bee (Cee)
The Bee’s Body

Using your chosen yarn weight and hook from the list in the Pattern Notes section, create a magic ring.
Round 1: 6sc into the magic ring, pull the tail to close the magic ring shut = 6
Round 2: inc x 6 = 12
Round 3: *inc, sc* x 6 = 18
Round 4: *inc, sc in next 2sts* x 6 = 24
Round 5: *inc, sc in next 3sts* x 6 = 30
Round 6: *inc, sc in next 4sts* x 6 = 36
Round 7: *inc, sc in next 5sts* x 6 = 42
Round 8: *inc, sc in next 6sts* x 6 = 48
Rounds 9: sc in each stitch = 48
Round 10: sc in next 14sts, sk2, (2dc,2tr,Pst, 2tr, 2dc) in the front loop of next stitch, sk2, sc in next 6sts, sk2, (2dc, 2tr, Pst, 2tr, 2dc) in the front loop of the next stitch, sk2, sc in next 18sts = 60
Round 11: sc in next 14sts, flip the ear forwards, sc in the 2sts you skipped on Round 10, sc blo in next, sc in next 2sts that you skipped on Round 10, flip the ear forwards, sc in next 6sts, flip the next ear forward, sc in next 2sts, sc blo in next, sc in next 2sts, flip the ear forward, sc in next 18sts = 48
Rounds 12 – 14: sc in each stitch = 48
Close round 14 with a slip stitch and switch colors to black, but don’t cut the yellow yarn.
Rounds 15 – 18: sc in each stitch = 48
Close round 18 with a slip stitch and switch colors to yellow, but don’t cut the black yarn.
Rounds 19 – 22: sc in each stitch = 48
Close round 22 with a slip stitch and switch colors to black, cut the black yarn and leave a long tail on the inside of the bee.
Rounds 23 – 26: sc in each stitch = 48
Close round 26 with a slip stitch and switch colors to black, cut the black yarn and leave a long tail on the inside of the bee.
Rounds 27 – 30: sc in each stitch = 48
Round 31: *dec, sc in next 6sts* x 6 = 42
Round 32: *dec, sc in next 5sts* x 6 = 36
Round 33: *dec, sc in next 4sts* x 6 = 30
Round 34: *dec, sc in next 3sts* x 6 = 24
Round 35: *dec, sc in next 2sts* x 6 = 18
Place the eyes, 5 rounds from the magic circle center. If you imagine the circle as being the face of a clock, the left eye will be at 10 o’clock and the right one at 2 o’clock.
Start stuffing the bee’s body with toy stuffing. Keep adding stuffing as you work up the rounds. Make sure it is firmly stuffed.
Round 36: *dec, sc* x 6, fasten off = 12
Finish stuffing the bee’s body, then use the tail to close off the hole. Weave in the end.
The Bee’s Wings

Using the same yarn weight in white and same hook size that you used for the bee’s body, create a magic ring. Make 2 wings.
Round 1: 6sc into the magic ring, pull the tail to close the magic ring shut = 6
Round 2: inc x 6 = 12
Round 3: *inc, sc* x 6 = 18
Round 4: *inc, sc in next 2sts* x 6 = 24
Round 5: *inc, sc in next 3sts* x 6, sl st to close the round, fasten off and leave a long tail = 30
Weave in the magic ring end and use the tail to sew the wings to the bee’s body on the yellow stripe between the 2 black stripes.
Make sure you center them between the eyes.
Embroidering The Face

Place your pins like in the picture above.
Use the video tutorial to embroider the face . The cat bee has 3 whiskers on each side of the eyes, and an X for the mouth.
Your Cat Bee is now complete.
Final Thoughts For The Easy Amigurumi Cat Bee Free Crochet Pattern
I hope you enjoyed making the amigurumi cat bee as much as I did. It’s such a fun, quick project that’s easy to customize.
You can make a whole hive of these cat bees in different colors and sizes.
If you like this design, please Share and Pin! Follow me on Pinterest here. Don’t forget to tag me @CraftingHappinessCrochet, I would love to see your version of the Cee.
Happy Crocheting!

Looking For Similar Patterns To The Amigurumi Cat Bee?
If you enjoyed this amigurumi cat bee, you might also like my other low-sew amigurumi animals and bee-themed projects.
They make fun, fast gifts and are perfect for using up leftover yarn.
- Free Amigurumi Bunny Head (No Sew)

- Free Amigurumi Cat Bee (Cee) Low Sew Pattern

- No Sew Octopus And Jellyfish: Free Crochet Pattern

- No Sew Crochet Cats & Dogs Free Pattern

- No Sew Crochet Strawberry Free Pattern

- Crochet Christmas Popcorn Garland Free Pattern

- Crochet Mini Crown Free Pattern & Video

- Stripes Easter Egg Free Crochet Pattern

Copyright
The photographs in this pattern are subject to copyright. They are the property of Crafting Happiness.
Don’t use them to advertise your own creations. You may use photos from this post only if you directly link back to this pattern.


