The Regular vs Invisible Decrease In Amigurumi


What Are the Regular & Invisible Decrease in Amigurumi
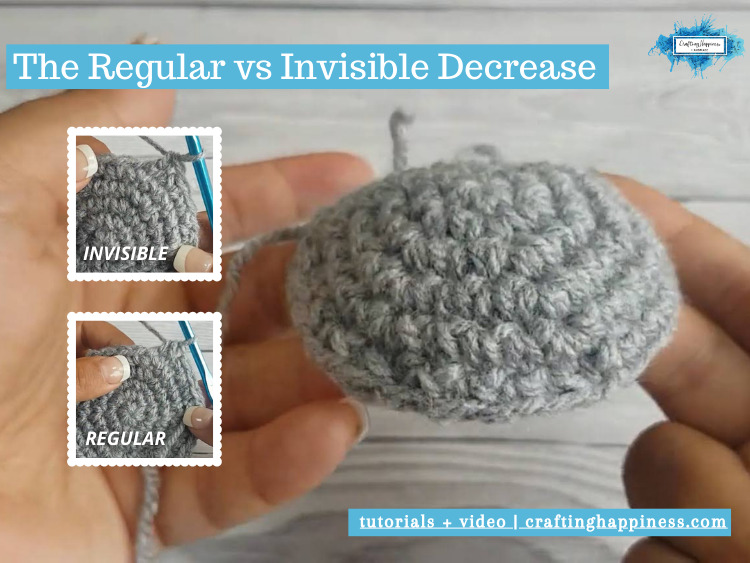
Today we are going to take a look at 2 different methods of decreasing in the round for Amigurumi projects: The Regular Decrease and The Invisible Decrease.
The Regular Decrease is a classic amigurumi technique of reducing the stitch count when you crochet in the round for Amigurumi projects by making a sc2tog (single crochet 2 together) stitch.
This method is widely used, especially by beginner crocheters, because it’s easy to learn and uncomplicated to make, but it might leave you with gaps and bumps in your projects.
But there is a better way of decreasing and it’s called The Invisible Decrease.
The Invisible Decrease is an advanced crochet technique used to decrease the number of stitches when working in the round for Amigurumi by using a combination of 2 stitches: scflo2together (single crochet in the front loop only two together) and sc (single crochet).
It might take a little bit to master, but the results are worthwhile: your decreases are barely noticeable, if ever, and there are no gaps or bumps showing. Just like the magic ring, it’s one of those must-know amigurumi techniques that you can’t do without once you start using it.
Below you will find the photo and video tutorials for both of these decrease techniques. First, we start with the regular decrease, and then, in the end, you will find the detailed step-by-step tutorial for the invisible decrease.
Please note that this post contains affiliate links, I will earn a small percentage should you choose to purchase something, but it will be at no cost to you. You can see my full disclosure policy here. Thank you for supporting my work and this blog.
The Regular Decrease Tutorial

If you are a visual learner, you can find the video tutorial below. Scroll down for the step-by-step instructions with photos.
Video Tutorial
Subscribe to Crafting Happiness YouTube Channel to save this video
How To Single Crochet Decrease In The Round For Amigurumi Projects
Pattern Notes
Pattern Characteristics
- amigurumi techniques
- basic stitches
Supplies Used
- Marriner Yarns Aran
- 5mm crochet hook
Abbreviations
Pattern written in US terms using Craft Yarn Council abbreviations.
- st(s) – stitch(es)
- sc – single crochet
- sc2tog – sc two together
- yo- yarn over
Regular Decrease Pattern Instructions
For this tutorial, I have made a crochet circle using the magic ring, sc stitches, and single crochet increases. Now let’s make a regular decrease, this is really simple, it’s just a sc2tog.
Insert the hook under the next stitch and pull up a loop (you will have 2 loops on your hook).

Insert the hook under the next stitch again and pull up a loop (you will have 3 loops on your hook).

Yarn over and pull through all 3 loops on your hook. You just completed a new decrease stitch.

And this is how you crochet the Regular Decrease. Now let me show you the difference between this regular decrease and the invisible decrease. Scroll down to see the tutorial.
The Invisible Decrease Tutorial

If you are a visual learner, you can find the video tutorial below. Scroll down for the step-by-step instructions with photos.
Video Tutorial
Subscribe to Crafting Happiness YouTube Channel to save this video
How To Crochet The Invisible Decrease In Amigurumi
Pattern Notes
Pattern Characteristics
- amigurumi techniques
- basic stitches
Supplies Used
- Deramores Studio Aran
- 5mm crochet hook
Abbreviations
- st(s) – stitch(es)
- sc – single crochet
- scflo2together – sc in the front loop 2 together
- flo – front loop only technique
Invisible Decrease Pattern Instructions
For this tutorial, I have made a crochet circle using the magic ring, sc stitches, and single crochet increases. Now let’s make an invisible decrease, I promise you it’s really not that hard.
You just have to make 2 stitches: a scflo2tog and a sc.
We will work in the front loops of the next 2 stitches.

Insert your hook, from bottom to top, under the front loop of the next stitch (you will have 2 loops on your hook).

Move your hook down and insert it under the next stitch’s front loop from bottom to top (you will have 3 loops on your hook).

Yarn over and pull a loop through the first 2 loops on the hook (you will have 2 loops left on your hook). You just made a scflo2tog.

Yarn over and pull through the 2 remaining loops on the hook (basically what you would do to complete a sc stitch). You just completed a new invisible decrease!

And this is how you crochet the Invisible Decrease. Now you can use this technique in your amigurumi projects and see what a big difference it makes to the overall look of your project. If you found this tutorial helpful, please share and Pin it! Follow me on Pinterest here.
Tag me @craftinghappinesscrochet with your creations.

Looking For Similar Crochet Tutorials?
- Foundation Treble Crochet (FTR) Tutorial

- Crochet Foundation Double Treble (FDTR) Tutorial

- Foundation Double Crochet (FDC) Tutorial For Beginners

- How To Crochet The Foundation Half Double Crochet (fhdc)

- The Regular vs Invisible Decrease In Amigurumi

- Foundation Single Crochet (FSC) Step By Step With Video

- How To Crochet A Double Treble (DTR) Stitch

- How To Crochet A Treble (TR) Stitch

COPYRIGHT:
The photographs in this tutorial are subject to copyright and are the property of Crafting Happiness, don’t use them to advertise your own creations. You may use photos from this post only if you directly link back to this tutorial.
Happy Crocheting!


