Diamond Wave Crochet Pattern (Tutorial + Video)


Diamond Wave Pattern – Pattern Description
Today I have another wavy crochet pattern tutorial for you called the Diamond Wave Pattern. I have a few wavy pattern tutorials on my blogs like the long wave pattern or the rolling wave stitch but this is my favorite of them all.
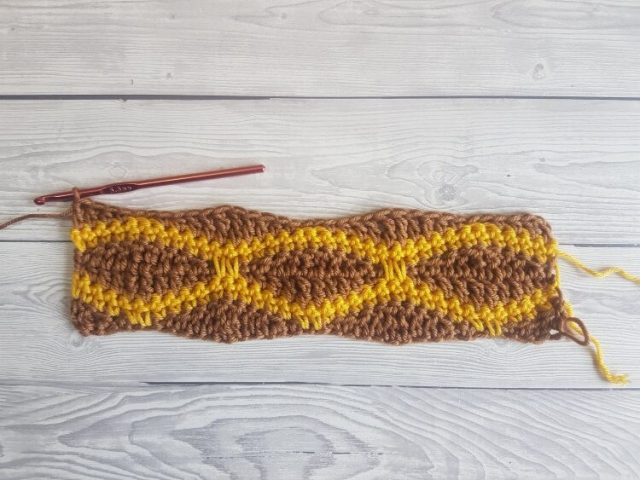
The diamond wave crochet pattern, also known as the stained glass stitch, is a wavy stitch that is crocheted in 2 or more colors and uses long single crochet stitches to give the illusion of individual colorful stained glass pieces or diamonds.
Today I will show you how to crochet the diamond wave pattern with step-by-step photos and explanations and a video for those of you who find it easier to learn by watching how is it done.
Please note that this post contains affiliate links, I will earn a small percentage should you choose to purchase something, but it will be at no cost to you. You can see my full disclosure policy here. Thank you for supporting my work and this blog.

Video Tutorial
Subscribe to Crafting Happiness YouTube Channel to save this video for later.
How To Crochet The Diamond Wave Pattern
Pattern Notes
Pattern Characteristics
- solid
- double-sided
Pattern Repeat
- Multiples of 12ch + 1ch
- 8-row repeat
Supplies Used
- Marriner Yarns Aran
- Click here for YARN ALTERNATIVES
- 5.5mm crochet hook
Abbreviations
Pattern written in US terms using Craft Yarn Council abbreviations.
- ch – chain
- yo – yarn over
- st(s) – stitch(es)
- sk – skip
- sc – single crochet
- long sc – long single crochet
- hdc – half double crochet
- dc – double crochet
- tr – treble
Special Stitches
Long Single Crochet (long sc) – A long single crochet is made in the same way as regular single crochet, except you insert your hook one or two rows below and draw a longer loop.


Pattern Instructions
- The yarn is carried on the side of the pattern for each color change and you can later on crochet a sc crochet border around it. If you don’t want to do that, cut the yarn at every color change and later on weave in the ends.
- To change colors, complete your stitch, then pull the new color through the loop on your hook.
- Ch1 made at the beginning of rows do not count as stitches, ch3 made at the beginning of rows count as a double crochet.
- The long sc stitches are made 2 rows below into the stitches that you skipped (except for Row 2 where you make them one row below into the chains you skipped on Row 1.
- Mix and match colors for a stained glass effect, but keep in mind that the single crochet rows should be made in one color only so it will look like a frame.
- Row 1 and the Final Row are there to give you a flat seam (useful for blankets)
This pattern requires you to chain multiples of 12 chains + 1 chain. My starting chain is 37 made in brown.
Row 1: continue with brown, dc in 5th ch from hook, hdc, sc, sk2, ch2, *sc, hdc, dc in next 2sts, tr in next 2sts, dc in next 2sts, hdc, sc, sk2, ch2*, repeat from * until you have 4sts left, sc, hdc, dc in next 2sts, turn

Row 2: switch colors to yellow, ch1 (does not count as a stitch), sc in next 4sts, long sc in next 2ch that you skipped one row below, *sc in next 10sts, long sc in the next 2ch one row below*, repeat from * until you have 4sts left, sc in last 4sts, ch1 (does not count as a st), turn

Row 3: continue with yellow, sc in each st across, turn

Row 4: switch colors to brown, ch1 (does not count as a st), sc, hdc, dc in next 2sts, tr in the next 2sts, dc in the next 2sts, hdc, sc, *sk2, ch2, sc, hdc, dc in next 2sts, tr in the next 2sts, dc in the next 2sts, hdc, sc*, repeat from * until the end of the row, turn

Row 5: continue with brown, ch1 (does not count as a st), sc, hdc, dc in next 2sts, tr in the next 2sts, dc in the next 2sts, hdc, sc, *sk2, ch2, sc, hdc, dc in next 2sts, tr in the next 2sts, dc in the next 2sts, hdc, sc*, repeat from * until the end of the row, turn

Row 6: switch colors to yellow, ch1(does not count as a st), sc in next 10sts, * long sc in the stitches you skipped 2 rows below (in row 4), sc in next 10sts*, repeat from * until the end of the row, ch1 (does not count as a st), turn

Row 7: continue with yellow, sc in each st across, turn

Row 8: switch colors to brown, ch3 (counts as a dc), dc in next, hdc, sc, *sk2, ch2, sc, hdc, dc in next 2sts, tr in the next 2sts, dc in the next 2sts, hdc, sc*, sk2, ch2, sc, hdc, dc in the last 2sts, turn
Row 9: continue with brown, ch3 (counts as a dc), dc in next, hdc, sc, *sk2, ch2, sc, hdc, dc in next 2sts, tr in the next 2sts, dc in the next 2sts, hdc, sc*, sk2, ch2, sc, hdc, dc in the last 2sts, turn

Row 10: switch colors to yellow, ch1 (does not count as a st), sc in next 4sts, long sc in the next 2sts (the ones you skipped 2 rows below), *sc in next 10sts, long sc in the next 2sts (the ones you skipped 2 rows below)*, repeat from * until you have 4sts left, sc in last 4sts, ch1 (does not count as a st), turn

Row 11: continue with yellow, sc in each st across, turn

Repeat rows 4 – 11 until you have the required length. This is a picture of the blanket I am working on, it shows you what the pattern looks like in multiple repeats (pattern coming soon!)

The final row is there to give you a flat seam, just like row 1. It also doesn’t skip stitches because you don’t want gaps in your project, instead, just make a sc in each.
Once you have the desired length for your project, make this row.
Final Row: switch colors to brown, ch1 (does not count as a st), sc, hdc, dc in next 2sts, tr in the next 2sts, dc in the next 2sts, hdc, sc, *sc in next 3sts, hdc, dc in next 2sts, tr in the next 2sts, dc in the next 2sts, hdc, sc*, repeat from * until the end of the row, fasten off.

And this is how you crochet the Diamond Wave Pattern. If you found this tutorial helpful, please share and Pin it! Follow me on Pinterest here.
Tag me @craftinghappinesscrochet with your creations.
Download The PDF Version
If you want to download the printable PDF version of this tutorial, you can do so when you join my Patreon.
Pattern Swatch

Looking For Similar Crochet Tutorials?
- How To Crochet The Classic Mesh Stitch

- Crochet Strawberry Stitch Tutorial & Video

- How To Crochet A Half Bobble Stitch For Blankets

- Crochet Linked Flowers Stitch: Step-by-Step Tutorial for Beginners

- How To Crochet The Cat Stitch Step By Step For Beginners

- How To Crochet The Feather Stitch (In Single And Multiple Colors)

- Crochet Bamboo Leaf Stitch Tutorial With Video

- Knotted Half Double Crochet

COPYRIGHT:
The photographs in this tutorial are subject to copyright and are the property of Crafting Happiness, don’t use them to advertise your own creations. You may use photos from this post only if you directly link back to this tutorial.
Happy Crocheting!


This is a beautiful pattern. On my swatch the waves bellow slightly. Is this normal?